Wednesday, December 31, 2014

The plan for 2015.

With it being the end of 2014 and tomorrow being 2015 I thought I'd talk about what I plan on doing next year so you all have an idea of what to expect on both of my blogs. This post is mainly going to be about this blog and I will do another post on my LEGO blog talking about what I'm going to be doing over on that one as well.

As you may have noticed there hasn't been that much activity on this blog for a while mainly because I've been struggling to think of content for it to be honest however this will hopefully change next year. The one thing I do know is I'm hopefully going to be posting up more tutorials about various things. I'm not sure about anything else yet but hopefully I can be a bit more active next year.

Fairly short one but I think that's everything I wanted to talk about so thanks for reading and have a happy New Year. :)

Friday, May 16, 2014

How To: Install and update packages in Ubuntu 14.04

In this guide i will show you how to install, uninstall and update packages on your Linux Ubuntu system. There are several different ways of installing and upgrading packages.(programs, applications) They are: The Synaptic Package Manager, The Update manager, The apt-get command and downloading and installing them manually. You may need to use the “sudo” command with the commands that are in this guide if you keep getting permission denied errors. To use it just type it like this:

sudo apt-get options

Then when prompted put in your password and hit enter. Where options is the different options that you put after the apt-get command.

First we’ll have a look at installing packages using the apt-get command. First you will need to update the package list. This is basically a list of all the packages that you can install and the reason you need to update the package list is so you can get the latest versions of the packages. You can do this by typing this into the terminal and hitting enter:

apt-get update

To upgrade any packages that have newer versions available type this:

apt-get upgrade

To download and install a package from the Ubuntu online repository all you need to do is open a terminal and type in this:

apt-get install packagename

Where packagename is the name of the package you want to install. To remove a package type:

apt-get remove packagename

The Synaptic Package Manager is like a graphical apt-get command. With it you can install, upgrade and uninstall thousands of packages. This is the easiest way to install, upgrade and uninstall packages if you are new to Linux.


On the left are filters which you can use to filter the packages into category's. On the upper right section is the package list which lists all the packages that's in the selected category. The bottom right section is where a description is of the package that is selected.

To install a package all you need to do is select the package you what to install by clicking in the small check box to the left of the package name and then selecting “mark for installation” from the drop down menu. To remove a package click on the small check box to the left of the package name and select “Mark for removal”. Then when your done click the “Apply” button and in the window that comes up simply click “Apply”.

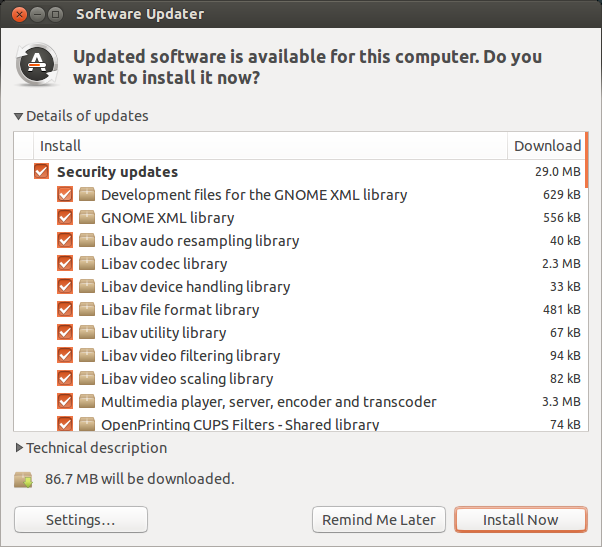
The Software Updater just handles updates. This is the easiest way to keep your system up to date.


The Software updater will automatically check for any updates and if there are any updates for your system they will be listed in the box in the middle of the window. Then all you do is click the “Install Now” button to install the updates.

Last we’ll have a look at manually downloading and installing packages. Ubuntu is based on Debian GNU/Linux so the package format that it uses is .deb. To install .deb packages you will either need Gdebi (A graphical tool to install .deb packages. The easy way.) or you will need to use the dpkg command.( The harder way.)

The Gdebi tool normally come with the standard Ubuntu install so you should already have it installed on your system. If not then just install it like so:

sudo apt-get install gdebi

And that should install the Gdebi tool.


To use the Gdebi tool to install a .deb package all you need to do is download the .deb package you want to install and then double click on the .deb package in the file browser window. Then just click the “install package” button. As you can see there is three tabs. Description, Details and Included files. All fairly self explanatory.

To install .deb packages with the dpkg command all you need to do is open a terminal window and type in this:

dpkg -i filename.deb

Where filename is the name of the package you want to install. To remove a package with dpkg type this:

dpkg -r packagename

Where packagename is the name of the package that you want to remove.

That’s all. now you should be able to keep your system up to date and be able to install and remove packages on your system.

How To: Checking Your Temperatures In Linux

In this How To i will show you how to check your temperatures in Linux. This works on all Debian based Linux distros. You will need to install two packages to read your temps. These are: lm-sensors and hddtemp. To install them type this into a terminal:

sudo apt-get install lm-sensors hddtemp

And type in your password when prompted. Once they've installed run this command:

sudo sensors-detect

and type in you password when prompted. This command scans your computer for any sensors it can find. It will ask you whether you want to scan for different types of sensors. Say yes to all these questions. When it's done it will show a list of drivers that are needed for the sensors that it finds. It will ask if you want to add these drivers to your "/etc/modules" file. Say yes here. Now when you type in this command:

sudo sensors

And type in your password when prompted. It should display the temperatures of all the sensors it found as well as any fan speed sensors.

To use hddtemp just simply run this command (and type in your password when prompted.) and it should display the temperature of your hard disk:

sudo hddtemp /dev/sda

Note: This part "/dev/sda" might be different on your computer. If "sda" doesn't work try "hda". Also if you have multiple hard drives then to check you second one replace "sda" with "sdb". Linux orders hard drives alphabetically so your first hard drive would be "sda" your second would be "sdb" your third "sdc" and so on.

And thats all there is to it.

Tuesday, February 25, 2014

My Personal PC Build, Part 4

Well it's been a while but I've finally got a new case and bigger hard drive for my main PC. Hard drive wise I got a 1TB 3.5" Seagate 7200rpm SATA hard drive so I finally don't have to worry about hard drive usage any more. As for the case I got a CoolerMaster silencio 352. A very nice Micro ATX case that fits all the hardware in it that I want and has a bit of room for upgrades. Here it is:

Looks good doesn't it?
And some pictures of the interior.

Excuse the cables as this case doesn't have much in the way of cable management on the other side as you will see in the next picture.

As you can see you can get away with thin cables but anything thicker than the 4 pin CPU power cable won't fit as there is a lip at the bottom of the motherboard tray.
The rear of it. All fairly standard.

Finally an overall shot.
So now that I've finally got a decent case and a bigger hard drive the next things I want to upgrade are the motherboard and CPU as I could do with a bit more CPU performance and the best way for me to do that is to move up to a newer generation Intel socket and processor. I could also do with a bit more RAM as I only have 4GB but it's gotten ridiculously expensive (8GB for around £60 to £70 quid. I got my 4GB for around £15 quid.) so yeah I'm going to wait and see if it does come down to a reasonable price.

The other major upgrade I want to do is the graphics card. I've been thinking about the most cost effective way of upgrading to a better graphics card however as I only have a 400W PSU it does limit what you can use a bit. As anything higher than my GTX 650 would really require a better PSU which would cost around the £40 to £50 quid mark for a decent one which is a lot when you add that on top of a new graphics card so I was a bit stumped until I heard that the new Nvidia GTX 750 TI would only use about the same amount of power as my GTX 650 but have quite a bit more performance compared to my GTX 650 so currently that is the graphics card I'm aiming for.

And that wraps up this post. Hopefully I can post a bit more regularly instead of every 3 or 4 months. You never know I guess...

Saturday, August 3, 2013

Quick Tech Tip #3: how to replace case fan connectors.

In this Quick Tech Tip I will show you how to replace a case fan connector. Its a fairly simple thing to do and useful if the case fan you have has either a broken connector or if you just don't like the colour. you will only need one tool for this and as long as it is able to fit in the slots on the connector it should do fine, I used a metal nail file for this but again as long as it's hard and thin enough to fit in it should work.

Before we start it's a good idea to make a note of the order that the wires go into the connector as you don't want to put them in the wrong way round do you? If your looking at the side of the connector with the slots in and with the wires coming from the bottom then the colours go from left to right:

  | |        | |        | |            | |

black - red - yellow - orange.

Note if you have a 3 pin fan connector you won't have the orange wire, Thats for 4 pin fan connectors.

In this example I'm replace the white connector of a  3 pin fan extension cable with a black Phobya 3 pin connector.

The extension cable before.
So first up you need to hold the wire you are going to take out first, Then take your tool (what ever you decided on) and push it down into the slot at the bottom if the wires are coming from the bottom. Gently pull the wire while doing this and it should come out fairly easily. Don't pull to hard or you might break the pin. Once you have the first one out do the same for the other and you should have something like this:

Connector removed.
Now it's just a simple matter of getting you replacement connector and pushing the pins one by one into the connector. remember to get the wires in the right order. You will here a faint click once there all the way in. Once you have all of them in it should look something like this:

New connector put on.
And your all done. That wasn't that hard now was it? This should work for pretty much all fan connectors however some fans have different coloured wires so make sure you make a note of which order they go in.

And thats the end of this Quick Tech Tip, Thanks for reading and I hope you've learnt something.

Thursday, June 27, 2013

My Personal PC build, part 3.

Hello again. Since the last part I have changed a few things in my main PC so this post will update you all on what I've done. First up a picture of the inside as of now.

Bit of a mess still I know but to be fair this case doesn't really have any cable management holes at all, Need to get a better case...

So the first thing I did was add a 120GB 2.5" hard drive that I upgraded my old PS3 with but then the PS3 died so I pulled it out of there and stuck it in my PC as I needed more room for the VirtualBox VMs I have. It's mainly been used as a storage drive at the moment but I still need to upgrade my main hard drive as it's only 80GB And I only have about 15GB free on it. The 2.5" drive currently sat in a Akasa 3.5" to 2.5" HDD/SSD adapter.

As you may know I was using a Intel Pentium 4 630 overclocked to 3.6GHz however I finally upgraded to a Intel Core 2 Duo E7400 which I currently have overclocked to 3GHz. As you can imagine the performance has improved quite a bit and it runs a lot cooler as well. At the same time I also replaced the 80mm Arctic F fan with a 92mm Zaward Golf Blue LED Fan so now the back of my PC glows blue.

After those upgrades the component that was slowing me down the most in terms of gaming was the graphics card (A Nvidia GeForce GT 610) so I decided that was the next upgrade I should do when I could afford it. I managed to get a Gigabyte GTX 650 1GB card that is factory overclocked and that increased performance in games a lot. It also runs cooler than my old GT 610 too. Here are the results from the Unigine Valley Benchmark using this graphics card:


I also have removed a couple of fans (The 120mm blue LED fan on the side panel and the 120mm Arctic F fan) as I'm trying to figure out where most of the noise is coming from and I've narrowed it down to either the front 120mm CoolerMaster SickleFlow fan or the fan on the Arctic cooling freezer 7 pro CPU heatsink. The fans will probably get moved around a bit more yet. Oh and I did actually win a 140mm Noctua NF-A15 PWM fan with 120mm mounting holes which is still in it's box as I'm not sure what to do with it yet.

The final thing I've done is add a 3 pin fan extension cable so the front 120mm CoolerMaster SickleFlow fan can be plugged into the motherboard as the 120mm Arctic F fan was connected there before I took it out. I also changed the female connector of the extension cable from a white one to a black Phobya one as it will blend in a bit better with the rest of my hardware. I will probably do a Quick Tech Tip on how to replace fan connectors so look out for that soon.

And that wraps up part 3. The next upgrades I would like to do are the case, hard drive and RAM so hopefully it won't be too long until I get some of those done and I can post part 4.

Saturday, June 22, 2013

Review: Novatech Vulcan V2 ATX PC case

Today I will be reviewing the Novatech Vulcan V2 Midi ATX PC case which is the case I'm currently using for my main PC. First I'll give you some of the specifications and them we'll get on with the review.

Specifications:


Dimensions: 43.8cm (H) x 47cm (D) x 18.5cm (W)
Weight: 6.2kg
5.25" Drive Bays: 3
3.5" Drive Bays: 5
Expansion Slots: 7
Top mounted PSU

Cooling Options
Front: 1 x 120mm Blue LED fan (Installed).
Rear: 1 x 80mm fan (Installed) or 1 x 92mm fan (Optional).
Side: 1 x 120mm fan or 1 x 140mm fan (optional).

Front Panel Ports
USB3.0 x 1 (Has a internal USB 3.0 motherboard header connector)
USB2.0 x 2
1 x Headphone
1 x Mic

Motherboard Support
Standard ATX
Micro ATX
Mini ITX

Link to product: http://www.novatech.co.uk/products/components/cases/cases/nov-vulca2.html

Main review:


As you can see it's a fairly standard ATX case which you can get for £18.98 from Novatech.co.uk and as this is a own brand case you can't get it anywhere else. Considering it's only £19 you get a 80mm fan, A 120mm blue LED fan, The usual motherboard standoffs and motherboard screws, optical and HDD drive screws and the PCI screws and a small motherboard speaker. However you don't get any proper PCI slot covers, The ones it has once you take them off you can't put them back on again.

The build quality is good considering the price however the side panels do bend a bit diagonally so that makes it a little harder when trying to put them back on. Both side panels use two thumb screws each at the back to fasten on to the case however they will stay on fairly well without them.

The one thing I don't get about the left side panel is there is mounting holes for one fan at the top and the mesh continues further down but there isn't another set of fan mounting holes yet there is enough room for another 120mm or 140mm fan. I thought it would make more sense to put either two sets of fan mounting holes on the side panel or at least put one set at the bottom to help cool your graphics card.

The front panel is fairly sturdy and provides good airflow as most of it is mesh with a thin layer of spongy like material that acts as a decent filter that does catch quite a bit of dust. The 5.25" bay covers and the 3.5" bay cover is also made of the same mesh and spongy stuff.

Moving on to the front I/O panel the power switch has a blue LED and feels quite nice to press. The two USB 2.0 ports feel a little bit loose when plugging in USB devices however I haven't had any issues with them yet. I haven't used the mic port that much yet however the headphone port has gotten a little dodgy so when I wiggle it a bit the sound can go crackly and can cut out. Clearly not a great quality port.

Also on my case the top right bit of silver trim can come away from the front panel. One last thing about the front panel is that it's a bit of a pain to pull off and the 5.25" and 3.5" bay covers are also quite difficult to get off as well although it is a bit easier to get them off when you have the front panel off.

Moving to the inside it's mostly straight forward. When putting in the PSU I did notice it is quite difficult to get the PSU lined up with the back so you can get all the screws in. Something clearly isn't quite lined up properly somewhere. Also there isn't much space around the motherboard area and while this didn't affect me as I have a Micro ATX board it may get a bit cramped in there if you was to use a full size ATX motherboard.

One thing this case is missing is a hole in the motherboard tray for getting to CPU cooler backplates. One thing I would have liked to have seen is a 120mm fan mount on the back as 92mm fans are harder to get and with all these new AIO CPU water coolers having 120mm radiators and fans there really isn't an option for using them with this case.

Because this is a fairly thin case at 18.5cm you don't have much room for CPU coolers. I currently have a Arctic Cooling Freezer 7 Pro Rev 2 cooler and it is 12.6cm tall so you would only be able to fit a cooler up to about 14cm tall which pretty much rules out all the CPU coolers that use 120mm fans and above.

Cable management wise there really isn't any however for wires with small connectors (aka fan wires and front I/O panel wires.) you can fit through the small holes that are there however pretty much all the cables from your PSU will have to stay on the motherboard side which makes it quite difficult to make it look tidy.

Modding it:


The first obvious mod that you could do to this case is a window in the left side panel as adding fans to the side panel isn't going to help much in terms of cooling and having holes in your side panel isn't going to help with dust either and well it just looks cool.

As there is actually a fourth 5.25" bay behind the front panel I/O ports you could cut that out and add either a blank 5.25" bay cover and replace the ports with some better quality ones or just have it as another 5.25" bay.

It is possible to fit a 240mm rad in the front with a bit of modding although you would lose two 5.25" bays and all the 3.5" HDD bays. There is enough room to fit a 120mm rad where the front 120mm fan mount is however you would need to remove the 3.5" HDD bays as only one 120mm fan will fit with them there.

It is also possible to put a 240mm rad on the floor if you cut out a couple of holes for the fans and again  remove the 3.5" HDD bays although you will not be able to use the bottom 3 PCI/PCIe slots on your motherboard if you use a thin radiator and one set of fans on the top or bottom of the rad.

Something else you might want to do is cut out a hole in the motherboard tray so you can get to the back of the motherboard to install/remove the CPU cooler backplate if you have one. Might make replacing you CPU cooler a bit easier.

Conclusion:


Overall this is a fairly decent case considering the price however there are a few quality issues that could do with being sorted out. There is a few features it's lacking but nothing that important. While this is a great case for people on a small budget if you can go higher then go higher as you will get more features and a bit better quality as well.

Final score: 7/10

If you have any questions please leave a comment below and I will do my best to answer. Thanks for reading my first review and hopefully I will get another one out soon.

Thursday, June 6, 2013

News: Going to be doing some reviews plus other stuff you can expect.

Hello all. Just a short bit for news for today, I am going to start to do a few reviews and post them on this blog. There won't be that many for a start as well I don't have that much to review. They will mostly be computer related although there might be a few other random things dotted about as well.

I will also try to post a few more Quick Tech Tips as the last one was posted pretty much a year ago so yeah... I will be writing the third part to the "My first PC build" series of posts as I've changed quite a few things on my main PC since the last post and finally I've started to work on CMDQuest again. For anyone that doesn't know CMDQuest is a command line RPG/open world game I'm making and I will be posting updates on how thats coming along too.

Right I think thats everything, Oh and one last thing I'm interested to know how many people actually read this so if you have come here before or even if this is your first time on my blog please leave a comment below. This would be much appreciated so thanks. :)

Saturday, April 20, 2013

How To: Gather information about your pc using the Linux command line.

Today I will show you how to use the Linux command line to find out all sorts of stuff about your PC hardware and software. There is also a bash script at the bottom of this post that will run all of these commands and save the information into a folder in your home directory and then create a archive of all the files.

Most of these commands should already be installed on your system however lm-sensors and hddtemp you probably need to install. I'll tell you how to install them when we get to them.

Right then on to the list.

sudo dmidecode

The command dmidecode gives you a lot of information about your PCs hardware which is read from the PC's BIOS. While not 100% reliable it's a good way to find out the more obscure stuff about your PC hardware. More information on dmidecode can be found here: http://www.nongnu.org/dmidecode/

sudo lspci

The lspci command lists all the PCI buses and devices connected to your PC, This can include USB controllers, The IDE controller, The SATA controller, As well as all the PCI/PCIe cards you have installed.

sudo lsusb

Similar to the lspci command the lsusb command lists all USB devices connected to the computer.

uname -a

This command displays the name of the PC, the kernel version, the date and time and architecture of your PC.

sudo lsmod

The command lsmod displays all the kernel modules that are currently loaded on your computer.

sudo fdisk -l /dev/sda

This command displays information about your hard drive like size, partitions and the file systems on the partitions as well as a few other details. Note that you may need to change the sda part depending on what type of hard drives you have as well as how many hard drives you have. Use the next command to find out the names of your hard drives.

df -hT

Similar the previous command this one lists all the filesystems mounted on the computer. This command is a good way to find out what your hard drives are called on Linux.

ifconfig -a

This command displays information about all the network interfaces active on your PC. Handy if you are setting up a network connection.

uptime

The command uptime displays the current time, how long the computer has been running, how many users are logged on and the load average for the past 1, 5 and 15 minutes.

echo $PATH

This command displays the contents of your $PATH variable. This is basically a list that the system uses to find executables when you call a command (like echo for example) so you don't have to go to the directory where the executables are before executing them.

To install the last two commands simply type this into a terminal:

sudo apt-get install lm-sensors hddtemp

And type in your password when prompted. Now you can use the "sensors" command and the "hddtemp" command. before you can use the "sensors" command you need to run:

sudo sensors-detect

This command scans your computer for any sensors it can find. It will ask you whether you want to scan for different types of sensors. Say yes to all these questions. When it's done it will show a list of drivers that are needed for the sensors that it finds. It will ask if you want to add these drivers to your "/etc/modules" file. Say yes here. Now you can run the sensors command:

sudo sensors

The sensors command displays the temperatures of all the temperature sensors as well as the RPM speed of any fan speed sensors.

sudo hddtemp /dev/sda

As the name might suggest this command displays the temperature of all the hard drives connected to your computer. As with the fdisk -l command you may need to change the sda part depending on what type of hard drives you have as well as how many hard drives you have. Use the df -hT command to find the names of your hard drives.

Finally here is that bash script that will run all of these commands and put the output of each of the commands into a file and put all of those files into a directory called PCinfo in your home folder. It will also create a .tar archive in the directory that the script is with all the files in.

I've also added a few commands that copy the syslog, apport.log and kern.log files as well as the fstab file into the PCinfo folder as well as these can also be useful for finding information about the Linux system.

Again where hard drive names are just simply replace them with your own. I may improve this at some point so if I do I'll try and remember to edit this post to update it as well as post it separately.

To use this bash script simply copy the following code and paste it into a empty text file and save it. Then you just need to allow it to be executed, To do this go to the directory the script file is in in a terminal and type this in:

chmod 755 PCinfo

Hit enter and it should now be able to be executed. What follows is the bash script:

#!/bin/bash

mkdir ~/PCinfo

sudo dmidecode > ~/PCinfo/dmidecode

sudo lspci > ~/PCinfo/pci_devices

sudo lsusb > ~/PCinfo/usb_devices

cp /var/log/syslog ~/PCinfo/

cp /var/log/apport.log ~/PCinfo/

cp /var/log/kern.log ~/PCinfo/

sensors > ~/PCinfo/sensors

uname -a > ~/PCinfo/uname

sudo lsmod > ~/PCinfo/lsmod

sudo fdisk -l /dev/sda > ~/PCinfo/disks

sudo hddtemp /dev/sda > ~/PCinfo/hddtemp

cp /etc/fstab ~/PCinfo/

df -hT > ~/PCinfo/disk_info

ifconfig -a > ~/PCinfo/network_info

uptime > ~/PCinfo/uptime

echo $PATH > ~/PCinfo/PATH

tar -cvf PCinfo.tar ~/PCinfo

Sunday, February 3, 2013

My Personal PC build, Part 2.

Hello again. This is the second part of the detailed list of components that make up my first PC build. Right now where did i get to... ah yes next up is the motherboard which is a M-ATX MSI G41M-P28 socket LGA775 motherboard. Some specs:


Intel G41 chipset
Integrated Intel Graphics Media Accelerator (Intel® GMA X4500)
Supports two unbuffered DIMM of 1.5 Volt DDR3 800/1066/1333* (OC) DRAM, 8GB Max
One PCI Express x16 slot (PCI Express Bus SPEC V1.0 compliant).
Two 32-bit v2.3 master PCI bus slots.
Four 3Gb/s SATA ports
One Ultra DMA 66/100 IDE controller
Audio chipset integrated by VIA® VT1708S

Next up is the processor, This used to be in my IBM M52:

Intel® Pentium® 4 Processor 630 HT
3.00GHz clcock speed.
2MB L2 cache
64-bit

Yeah i know it's a fairly old CPU but hey when you can't afford anything better you have to use what you got right? This is one of the areas i plan on upgrading. The CPU cooler i'm using is a Arctic Cooling Freezer 7 Pro Rev 2 which is fairly cheap but well built and it does the job.

Next up is the RAM. I have one stick of Crucial 4GB 240 pin DDR3 PC3-10600 RAM. I can go up to 8GB which is the plan. Last up is the graphics card which is a Asus GeForce GT 610, Yeah not that great but for most of the games i play it works very well and it works with Linux which is always good as I am now Using Linux and my main OS. A few specs:

1GB DDR3 RAM
PCI Express 2.0
Low Profile
HDMI, DVI-I, VGA
DirectX 11.0
OpenGL 4.2

And I think thats it. Overall not a bad PC if I do say so myself. There are some things that could do with upgrading but it's still pretty quick compared to my last PC anyway. Anyway Cya next time.